Ford Mustang (1999-2004) Service Manual: Engine - 3.8L
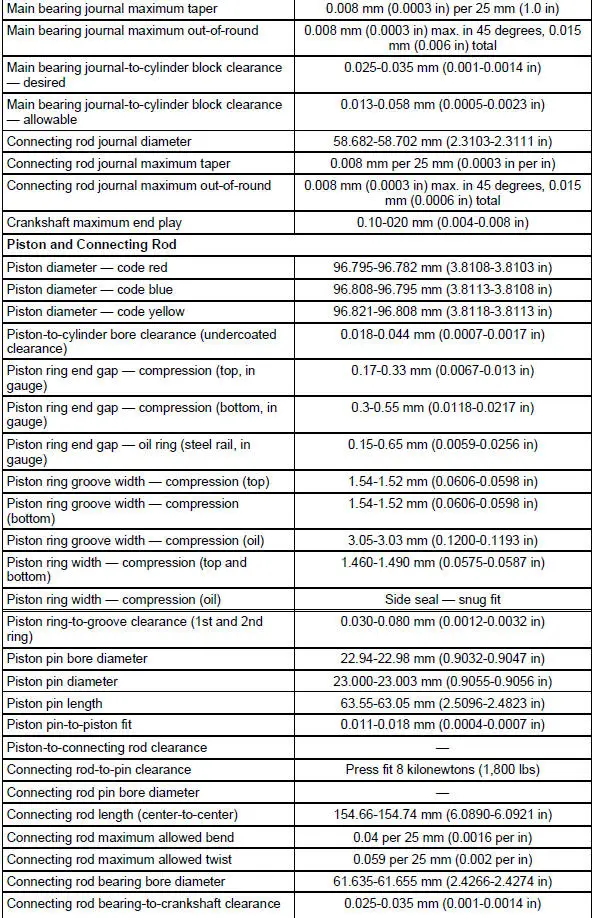
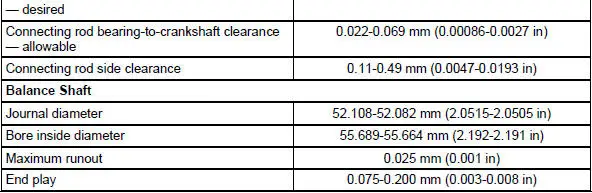
General Specifications

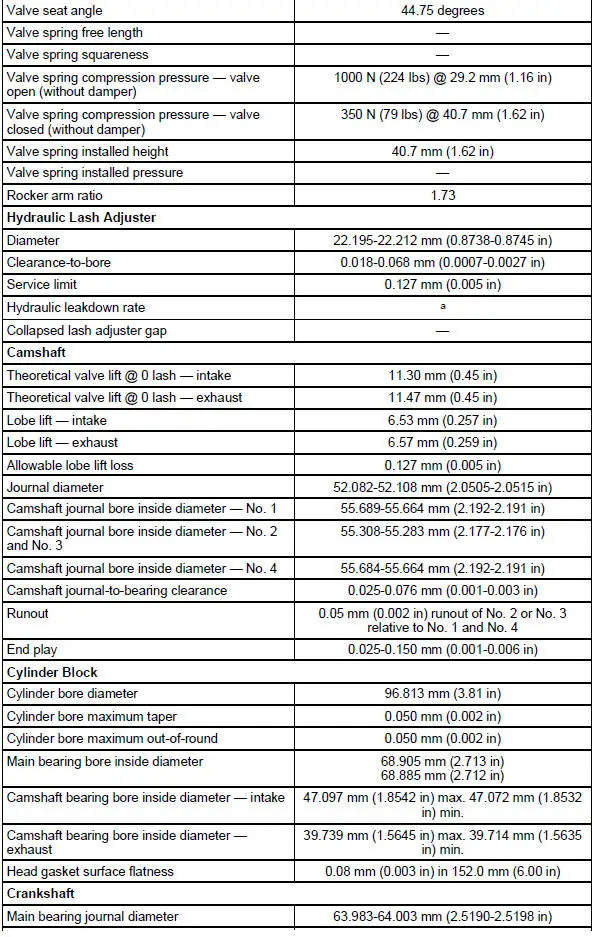
a - 20-200 seconds to leakdown 3.18 mm (0.125 in) with 225 Newtons (50 pounds) load and tappet filled with leak-down fluid.
Torque Specifications
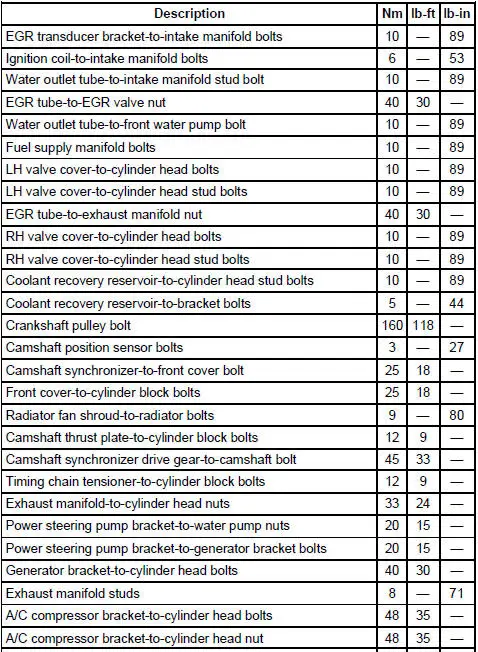
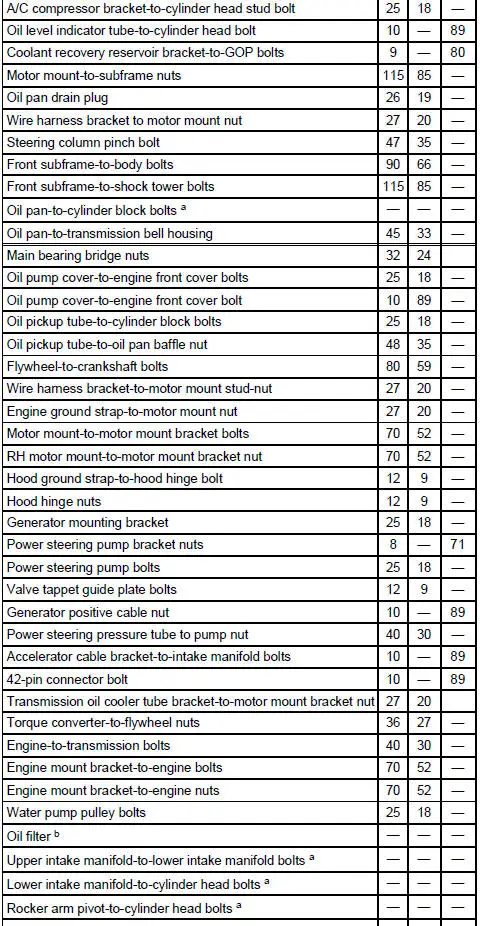

a - Refer to the procedure in this section
b - Advance one-half turn after gasket contacts the sealing surface.
Engine (DESCRIPTION AND OPERATION)
The 3.8L engine has:
- a V-block with six cylinders and splayed crankpins.
- a distributorless ignition system.
- a multiport, sequential fuel injection (SFI) system.
- overhead valves.
- hydraulic valve tappets for automatic lash adjustment.
- connecting rod parting faces that are unique with an interference fit.
- an engine dynamic balance shaft.
- Engine Component View
- Upper Intake Manifold
- Lower Intake Manifold
- Valve Cover - LH
- Valve Cover RH
- Crankshaft Pulley
- Crankshaft Front Seal
- Engine Front Cover
- Rocker Arm
- Push Rod
- Valve Springs
- Valve Tappets
- Camshaft
- Engine Dynamic Balance Shaft
- Timing Chain
- Exhaust Manifold - LH
- Exhaust Manifold RH
- Cylinder Head LH
- Cylinder Head RH
- Oil Level Indicator and Tube
- Oil Pan
- Oil Pan Baffle
- Oil Pump Screen and Pickup Tube
- Flexplate
- Crankshaft Rear Seal
- Engine Support Insulators
- Engine (Removal)
- Engine (Disassembly)
- Cylinder Head
- Piston
- Engine (Assembly)
- Engine (Installation)
 Exhaust Manifold - Inspection
Special Tool(s)
Straight Edge
303-D039 (D83L-4201-A) or
equivalent
1. Place a straight edge across the exhaust manifold flanges and check for
warping with a feeler
gauge.
Bearing ...
 Engine Component View
Cylinder Heads and Valve Train Components
Engine Front Cover Components
Engine Components
Cylinder Block and Lower End Components
Engine (DIAGNOSIS AND TESTI ...
Other materials:
Opening the convertible top
Note: Do not store articles behind rear seat. Articles stored in the
convertible top stowage compartment may break the rear glass window
when the top is opened.
Note: Opening the convertible top when the top material is wet may
cause mold or mildew.
The conv ...
A/C Compressor and Clutch Assembly
NOTE: Internal A/C compressor components are not serviced separately.
The FS-10 A/C compressor
is serviced only as an assembly. The A/C clutch pulley, A/C clutch field coil
(19D798) and the shaft
seal are serviceable.
The FS-10 A/C compressor has the follo ...
Battery Tray
Removal and Installation
WARNING: Batteries normally produce explosive gases which can
cause personal injury.
Therefore, do not allow flames, sparks or lighted substances to come
near the battery. When
charging or working near a battery, always sh ...
